VW T4 Short Shift Mod: Shorter, More Positive Gear Changes
A simple modification to the T4 swivel bracket that reduces gear lever travel by moving the gearstick rod mounting point closer to the bracket centre. No replacement short-shift kit is required for the linkage arrangement shown here.

This modification changes the lever ratio. It does not remove play from worn bushes, balls or joints. If the gear change is sloppy, vague or difficult, use the Just T4s gear linkage diagnosis guide first.
VW T4 Gear Linkage Problems & Repair →
What the short shift mod does
The standard linkage uses a swivel bracket to transfer movement from the gearstick rod to the gearbox linkage. By relocating the gearstick-side mounting point closer to the swivel bracket’s centre pivot, the same movement at the gearbox requires less movement at the gear lever.
On the linkage arrangement covered by this guide, the commonly used modification is to relocate the mounting hole approximately 35 mm inboard from the centre of the original outer hole. This gives a noticeably shorter lever throw while retaining the original bracket and bush.
T4 linkage arrangements vary by gearbox, year and engine. The bracket shown in this guide is the common arrangement used on a number of manual T4s, including vans using the familiar swivel bracket layout. If your bracket, rod end or pivot arrangement does not match, stop and identify the linkage before modifying it.
Tools required
Before you start
Park on level ground, select neutral and secure the van. If you need to work underneath, support it safely. Check the existing gear change through all gears before touching the linkage so you know whether any fault already exists.
Take a photo of the bracket and rods before disassembly. It is a ten-second insurance policy against spending half an hour later wondering which way a rusty piece of steel used to face.
Identify the parts
Viewed from the rear of the van looking forward, the linkage covered here has a central swivel bracket. One rod approaches from the gearstick side, while the other connects towards the gearbox selector mechanism. The gearstick-side rod passes through a rubber bush in the outer section of the swivel bracket.
Gearstick rod uses the original outer hole on the swivel bracket.
centre pivot original rod position
Rod position moves approximately 35 mm towards the centre pivot.
centre pivot new position original hole
Why it works: shortening the effective lever arm means less movement at the gearstick is needed to produce the same movement at the gearbox linkage.
Check the linkage before drilling
The short shift modification in this guide applies to the swivel bracket arrangement shown throughout the article. T4 selector linkages vary by gearbox and model year, so do not use the 35 mm dimension on a different bracket arrangement simply because the van is a T4.
The modification, step by step
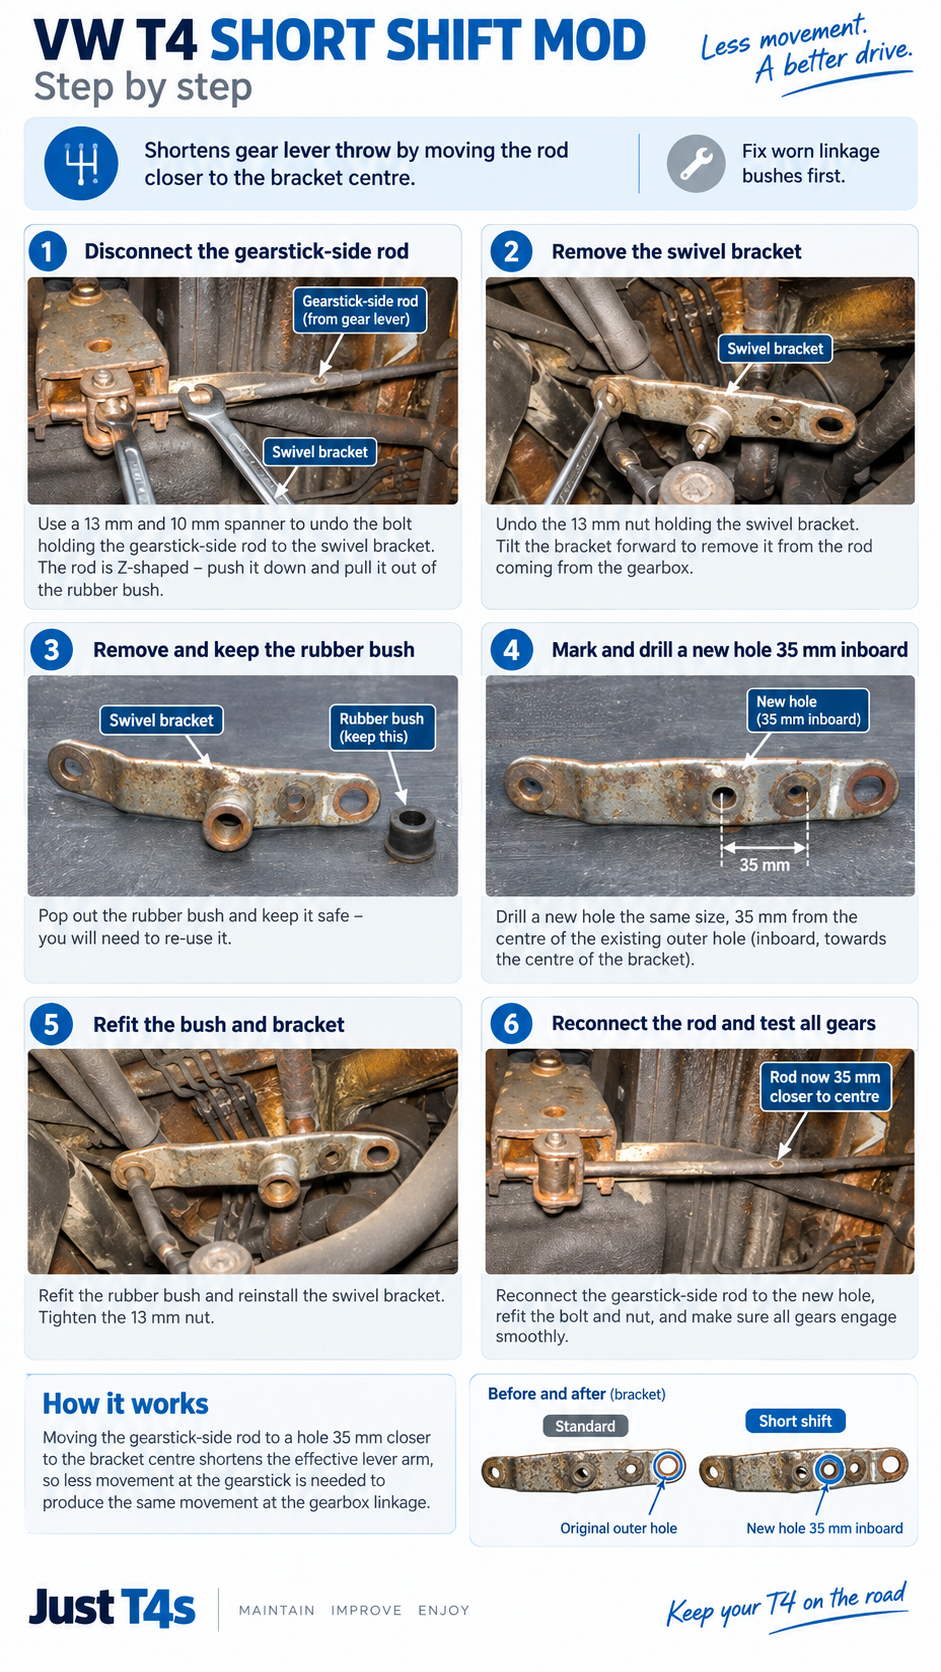
Disconnect the gearstick-side rod
Use the 13 mm and 10 mm spanners to undo the fastener securing the smaller rod from the gearstick to the swivel bracket. Support the rod as the fastener is removed.
Release the rod from the bush
The rod end is shaped so it can be pushed down and withdrawn from the rubber bush once the fixing has been removed. Do not damage the bush if you intend to reuse it.
Remove the swivel bracket
Undo the central 13 mm nut holding the swivel bracket. Once released, tilt the bracket forward and disengage it from the rod coming from the gearbox side.
Remove and retain the rubber bush
With the bracket on the bench, pop the rubber bush out of the original gearstick-side hole. Inspect it closely. If it is split, excessively soft or badly worn, replace it rather than putting a tired bush back into a freshly modified linkage.
Mark the new hole
Measure 35 mm from the centre of the original outer hole towards the bracket centre. Mark the new centre carefully and confirm there is enough material around the proposed hole for the bush to be supported properly.
Drill the new hole
Centre punch the mark if possible, then drill a new hole the same finished size as the original bush hole. Keep the drill square to the bracket. Deburr both sides so the rubber bush cannot be cut during refitting.
Refit the rubber bush
Install the original or replacement bush into the new hole. Make sure it is fully seated and not twisted or damaged.
Refit the swivel bracket and rod
Reconnect the gearbox-side linkage, refit the swivel bracket to its central pivot and reconnect the small gearstick-side rod through the relocated bush. Refit and tighten the original fasteners correctly.
How the finished modification should look
The gearstick-side rod now connects to the swivel bracket roughly 35 mm closer to the central pivot than before. Because the effective lever arm is shorter, the driver moves the gearstick through a smaller distance to create the required movement at the gearbox linkage.
The original outer hole can remain in the bracket. That also means the modification can usually be returned to the standard geometry later by moving the bush and rod back to their original position, provided the bracket has not otherwise been altered or damaged.
Checks before driving
If it feels wrong afterwards
If a gear becomes difficult to engage, the lever feels abnormally tight or the linkage reaches the end of its travel before a gear engages fully, do not force it. Recheck the bracket orientation, bush location and linkage condition. Return the rod to the original hole if necessary while the problem is investigated.
If the gear change was vague before the modification, rebuild the worn linkage rather than attempting to compensate with further geometry changes.
Parts and bushes
If you find wear while carrying out the modification, Just Kampers currently lists linkage balls, selector bushes, lower gearstick bushes, relay bushes and a T4 linkage bush set. Replace damaged wear parts before judging the result of the short shift modification.
Affiliate link: Just T4s may receive a commission if you buy through this link, at no extra cost to you.
Related Just T4s guides
VW T4 Gear Linkage Problems & Bush Repair · How to Lower a Volkswagen T4 Properly
Discuss the short shift mod
Done this modification on your own T4? Add your gearbox, engine, photos and results to the Just T4s forum so we can build a better compatibility record around the different linkage versions.